

When you’ll need this
- Something the AI knows is inaccurate or out of date, and you need to find that stored item to correct or delete it.
- Knowledge keeps piling up and you want a group structure that keeps different parts of the business separate.
- An item is filed under the wrong group and needs to move, or a group is no longer in use and should be disabled.
- You deleted something by mistake and need it back, or you want to clear items out of the Recycle Bin for good.
How to get there
Left menu → Knowledge Base → Knowledge Management. The page opens on “Group Structure”; the search bar at the top searches stored knowledge, and typing a keyword switches to the search results. The “Default” group is built in: you cannot rename, delete, or disable it.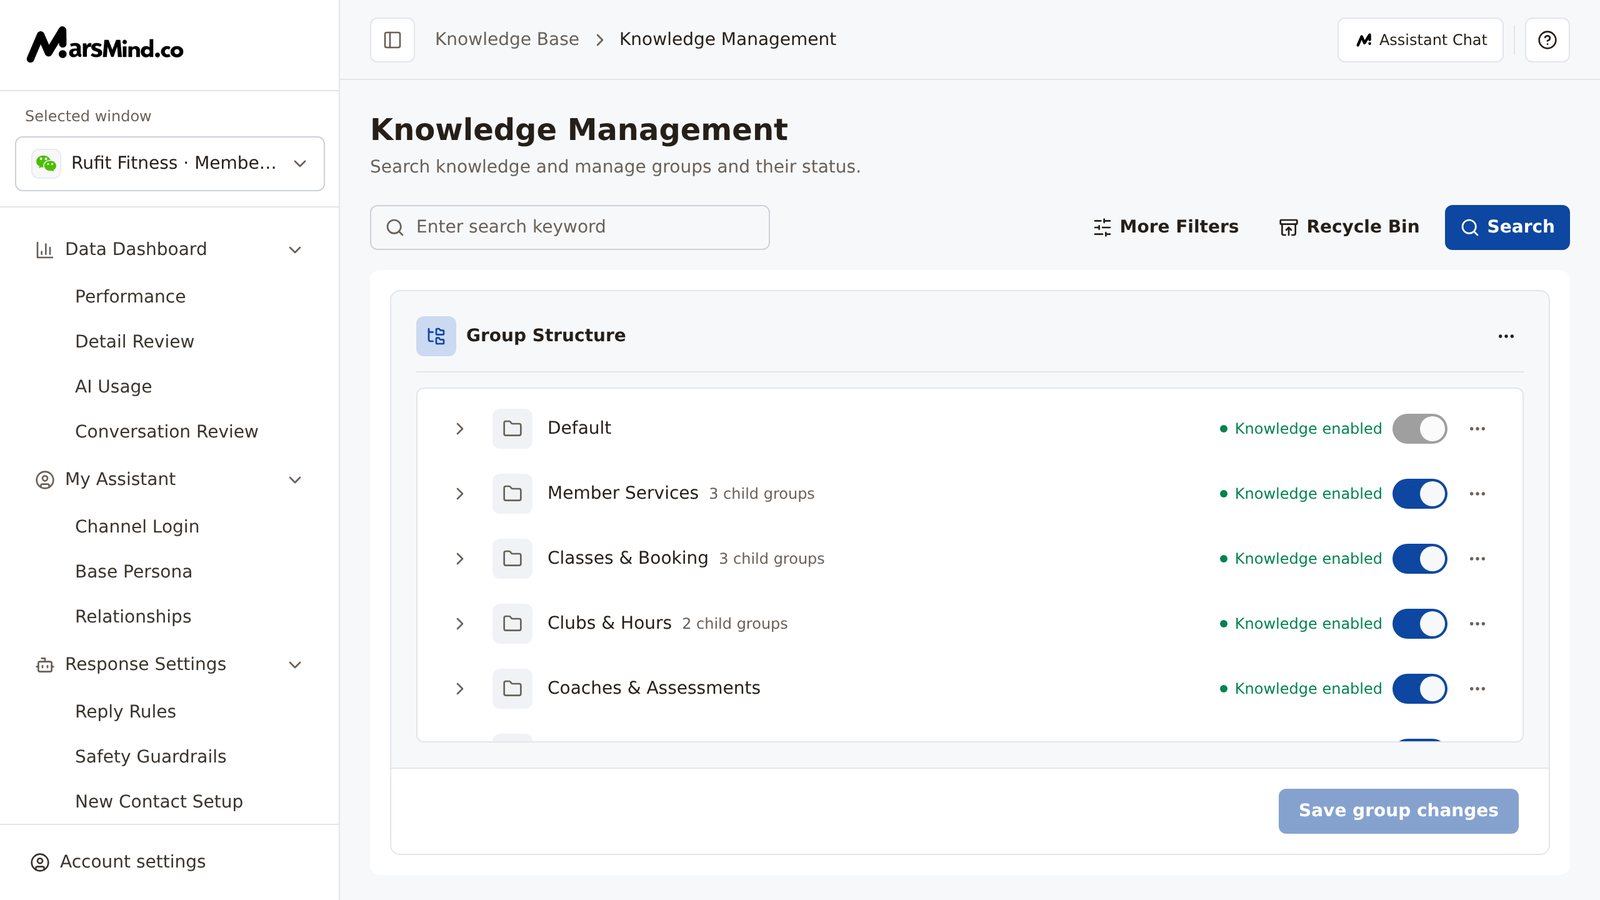
Steps
1
Adjust the group structure: add, rename, enable or disable, and delete
In “Group Structure”, each group is a row: the name on the left (with an “N child groups” label when it has children), status text and a toggle on the right, and a ”⋯” menu at the end with “Edit”, “Add Child Group”, and “Delete”.
- Add: click ”⋯” to the right of the “Group Structure” header row and choose “Add Top-Level Group” to create a top-level group; in a row’s ”⋯” menu, choose “Add Child Group” to create the level below it.
- Rename: row ”⋯” → “Edit” — the group name becomes an input (placeholder “Enter group name”); press Enter or click elsewhere to finish.
- Enable or disable: click the toggle at the end of the row; after the change, the status text reads “Enable after saving” or “Disable after saving” — these labels mean the change is not written yet.
- Delete: row ”⋯” → “Delete”, then click “Delete” in the “Delete Knowledge Group” dialog. The dialog states, “This group will be removed from the list immediately.” This step takes effect right away and has no recovery path; every other change must be saved.
- Clicking a group name opens it for viewing — it does not rename it. At a level with no child groups, the page shows the knowledge in that group directly (see the next step); to rename, use ”⋯” → “Edit”.
- Four levels maximum: a level-4 group’s ”⋯” menu has no “Add Child Group”.
- Disabling a group takes its knowledge out of use (applied when you save); the “Default” group is always enabled — its toggle is not clickable and its menu has no “Edit” or “Delete”.
- A new group cannot be saved without a name; you are asked to “Please fill in all category names”.
- If you leave the page with unsaved group changes, a “Discard group changes?” dialog appears: click “Cancel” to stay and keep editing, or “Discard changes” to drop this round of changes.
2
Find the knowledge you need: browse by group or search by keyword
Browse by group: in “Group Structure”, click a group name to go down level by level; at a level with no child groups, the list shows that group’s knowledge directly. Switch the displayed type with “Questions & answers” and “Paragraph Knowledge”, and click “Back” to return to the previous level.Search by keyword: enter a keyword in the top search bar (placeholder “Enter search keyword”) and the page switches to the search results after a brief pause; you can also press Enter or click “Search” to run it right away. The search covers all stored knowledge in the library, not just the group you have open. To narrow it down, expand “More Filters”:
- “Content type”: “Questions & answers” or “Paragraph Knowledge”;
- “Knowledge Scope”: “All Knowledge Bases”, “Enterprise”, or “Personal”;
- “Knowledge Category”: restrict results to one group;
- “Source”: filter by where the knowledge came from (for example, “Document”, “Website”, or “Supervisor Conversation”).
3
Edit knowledge, change its category, or delete it
Edit: click ”⋯” → “Edit” at the end of the row; the row switches to edit mode — the title becomes an input (placeholder “Enter title”) and the body becomes a rich text editor (placeholder “Enter content”). To attach a file to the knowledge, click “Insert File” (up to 100MB per file). After a change, the status at the bottom changes from “No unsaved changes” to “Unsaved changes · Not saved to knowledge”, and only then does “Save changes” become clickable. After saving, “Save successful, recalculating match score” appears and the list shows the new content.Change category: click the “Knowledge Category” cell in the row (with the folder icon) to open the “Change Category” dialog, pick the target group, and click “Confirm” — the message “Moved N items to the target knowledge group” appears. To move several items at once, select them first (the header checkbox selects only the current page); the “N selected” action bar appears — click “Change Category”.Prerequisite: before moving items, you must choose “Enterprise” or “Personal” under “More Filters → Knowledge Scope”. Left on “All Knowledge Bases”, the move is blocked with “Choose Enterprise or Personal in More Filters before moving items to a group”. Switching the scope reloads the list and clears the selection, so select items again after setting the scope.Delete: row ”⋯” → “Delete”, then click “Confirm” in the “Confirm Delete” dialog; “Deleted” appears and the item leaves the list for the Recycle Bin. For batch deletion, select items and click “Batch Delete” in the action bar; the dialog asks “Delete N selected items?”.How to tell it worked: after saving an edit, the list shows the updated title and content; after a move, the row’s “Knowledge Category” is the target group; after a delete, the item no longer appears in the list (look it up in the Recycle Bin).Note: if you switch away without saving, a “Discard unsaved changes?” dialog appears — “Keep editing” retains your input, and “Discard changes…” drops it and continues the action you started; unsaved content is only parked in the current browser tab.
4
Restore or permanently delete items in the Recycle Bin
Click “Recycle Bin” to the right of the search bar; the page shows “View deleted knowledge, restore it, or delete it permanently.”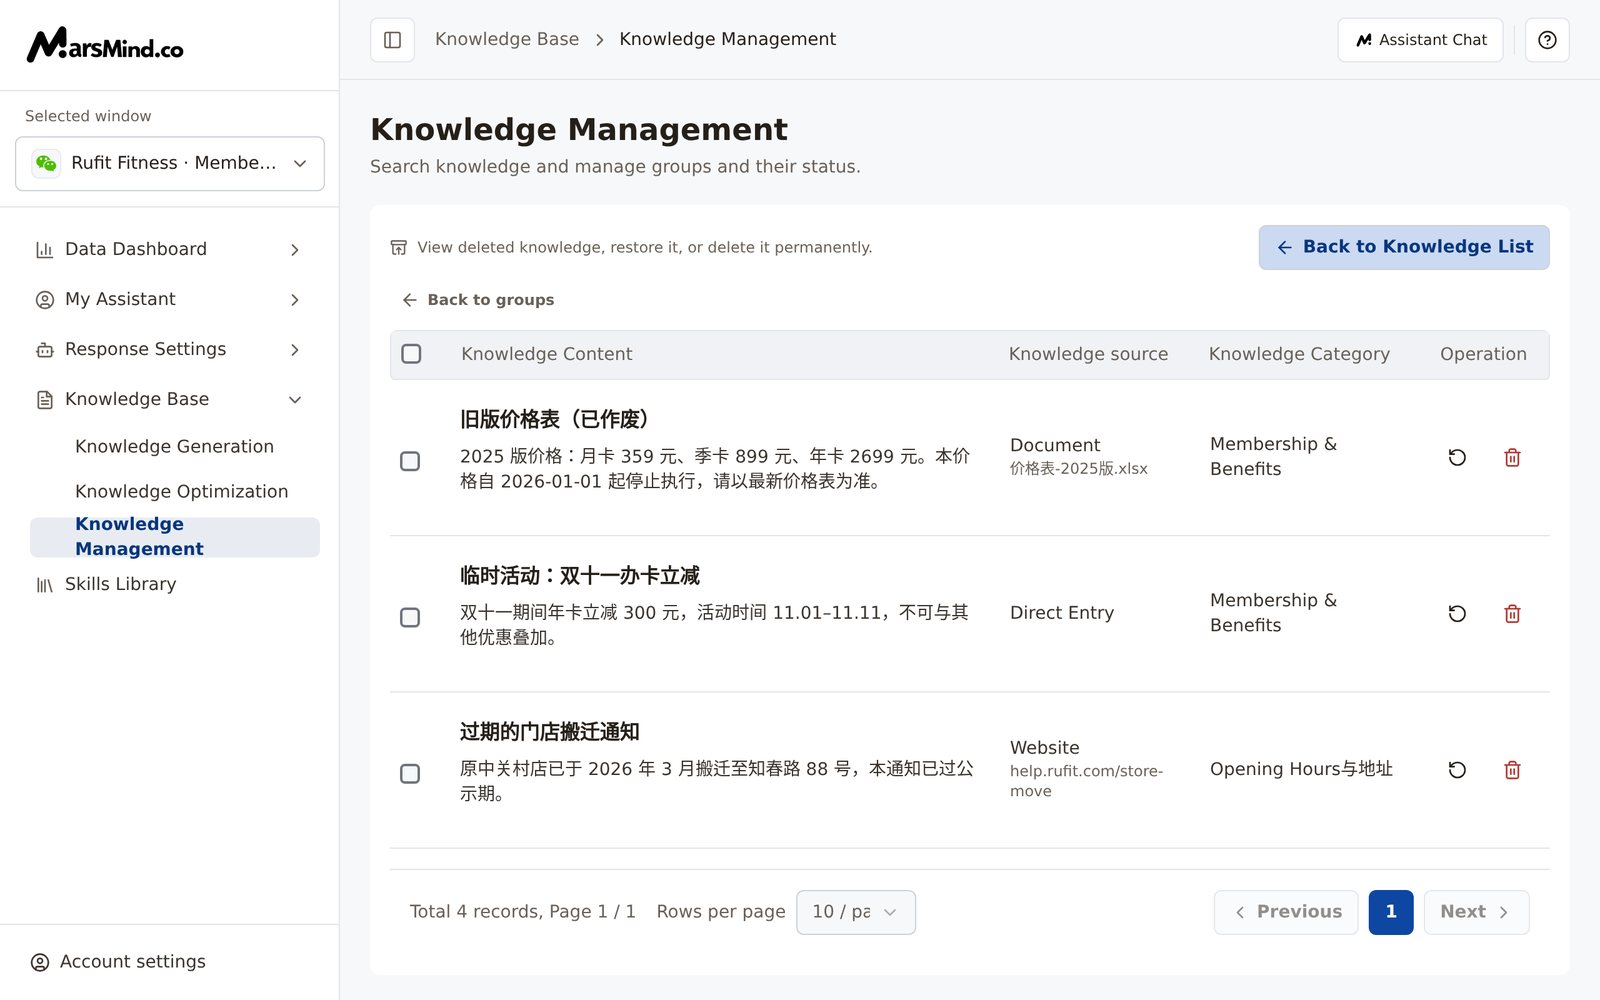
- Restore one item: click the restore icon at the end of the row and click “Confirm Recover” in the dialog; “Restored” appears and the item returns to the library;
- Permanently delete one item: click the delete icon at the end of the row; the “Confirm Permanent Delete” dialog says “Permanently deleting ”…” cannot be undone. Continue?” — click “Confirm Permanent Delete” and “Deleted” appears;
- Batch: select items to bring up the action bar, then click “Batch Recover” or “Delete Permanently”; the dialogs spell out the count and the consequence (“Restore the selected N items?” / “Permanently deleting N selected items cannot be undone. Continue?”).
Checkpoints
- Group changes: the row shows “Pending” → click “Save group changes” → “Save successful” appears and the mark disappears; a deleted group is removed from the list immediately.
- Search: with a keyword or filters, the list returns results and shows “Total N records, Page X / Y” at the bottom; with nothing entered it shows “Enter a keyword or choose filters to start searching” and does not pull the whole library.
- Move: “Moved N items to the target knowledge group” appears and the row’s “Knowledge Category” changes to the target group.
- Delete and restore: a deleted item goes to the Recycle Bin; restoring it shows “Restored” and removes it from the Recycle Bin.
Important notes
Keyword searches cover all stored knowledge in the library, not just the group you have open; only a “Knowledge Category” filter narrows the results to one group. The “Default” group is built in and always enabled — it cannot be renamed, deleted, or disabled. Groups can go up to four levels deep.