

When you’ll need this
- You have product documentation, price lists, FAQs, and similar material that you want to turn into AI-usable knowledge in bulk.
- Your material is scattered across a help center or a few webpages, and you want the system to crawl it by URL instead of copying it by hand.
- You have a verified Q&A or explanation and want to add it directly, without waiting for review.
- You want to look back at where an earlier task got to, or process the knowledge it generated.
How to get there
Left menu → Knowledge Base → Knowledge Generation.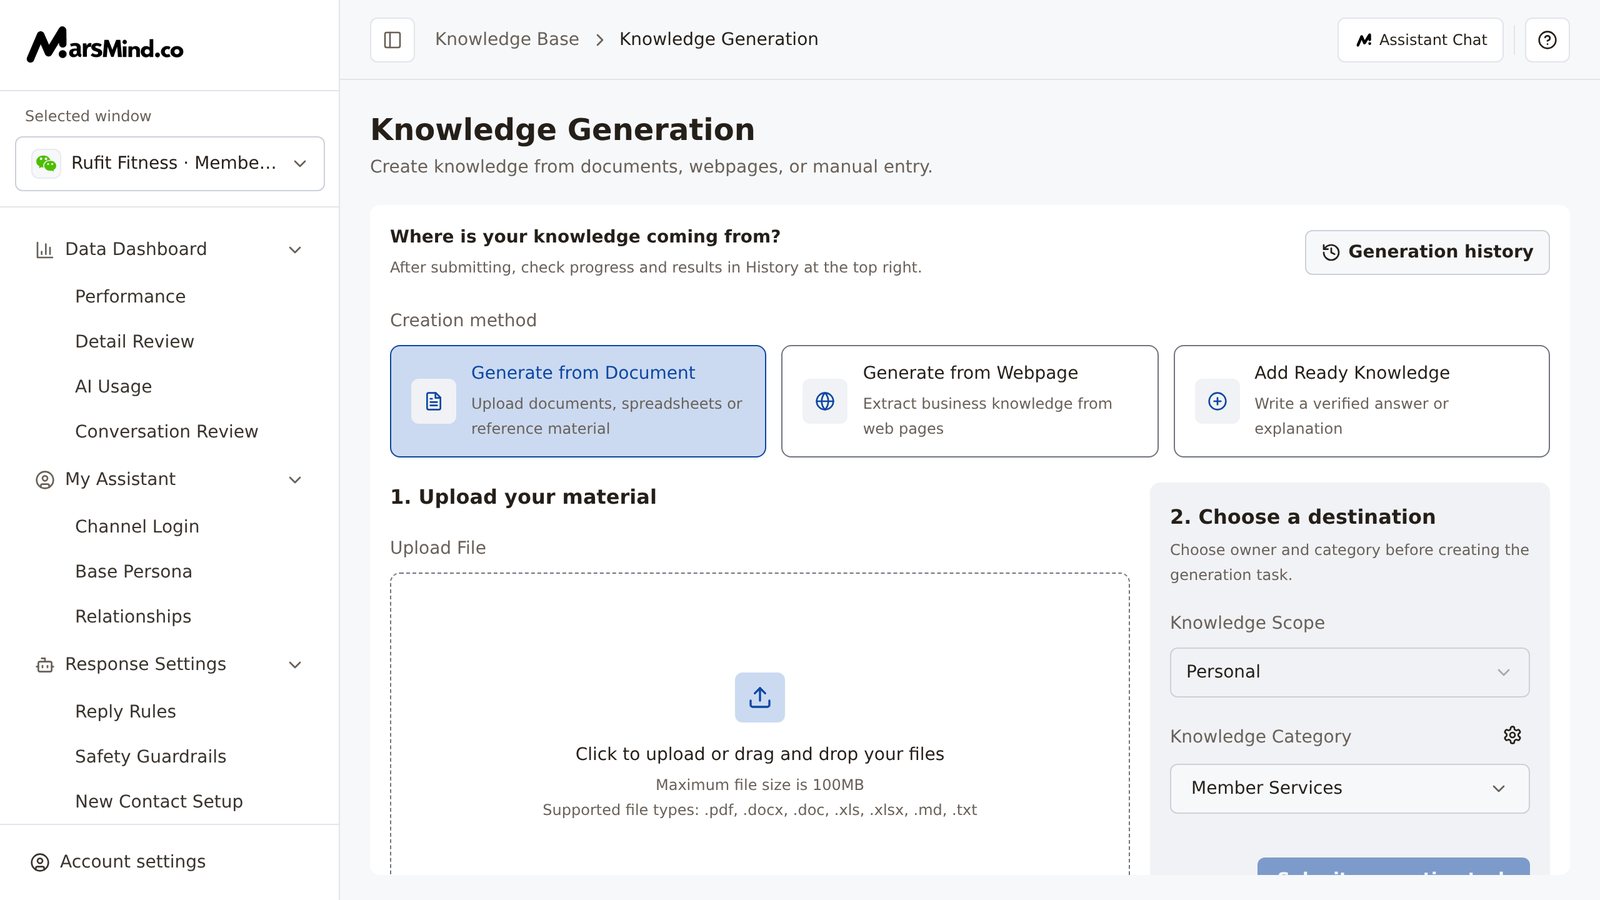
Steps
1
Choose the creation method in Where is your knowledge coming from?
The three methods map to three cards — click a card to switch, and only one method’s form is shown at a time:
- Generate from Document: upload existing documents, spreadsheets, or reference material;
- Generate from Webpage: extract business knowledge from specified web pages;
- Add Ready Knowledge: write a verified Q&A or explanation.
2
Set the scope and category in 2. Choose a destination on the right
All three methods share this panel. First choose the Knowledge Scope: Personal or Enterprise. Then click Knowledge Category; in the popup group list, select the target group and click Confirm.How to tell it worked: the group path shown on the panel is where this knowledge will go.Note: it defaults to Personal and the first available group (usually “Default”) — adjust before submitting. If the group list fails to load, “Failed to get category tree” appears (click Retry); if there are no enabled groups, the panel shows “No enabled groups are available. Use group management to create or enable a group.” In either case you cannot select a group, and submission is blocked. To create or adjust groups, click the gear button to the right of Knowledge Category (tooltip: “Knowledge Management”) to add a top-level group, add a child group, or save group changes.
3
Generate from Document: upload your material and submit
In “1. Upload your material”, click the upload area to select files, or drag files in. Supported file types are .pdf, .docx, .doc, .xls, .xlsx, .md, .txt; up to 100MB per file and 500 files at a time.Files upload automatically as soon as they are selected: a progress bar shows while uploading, and a green check appears next to each file when it finishes. If an upload fails, click the retry icon to upload it again, or delete it and re-upload. Once every file has uploaded successfully, click “Submit generation task”; the “Confirm Credits Consumption” dialog shows “Expected credits consumption: …” and “Rule: N documents × 100 credits per document”. Click Confirm to submit, or Cancel to not submit this time.How to tell it worked: “Task submitted. View its result in Generation history.” appears and the page switches to Generation history.Note: as long as any file is still uploading or has failed, “Submit generation task” stays disabled; the button also requires a knowledge group to be selected. The credits confirmation only appears for the document method.
4
Generate from Webpage: add links and submit
In “1. Add web page sources”, enter or paste web addresses in the “Upload Link” field; separate multiple URLs with commas or line breaks. A bare domain (for example, www.marsmind.co) is completed to https:// automatically, with the message “Added https:// to N URL(s)”. Only addresses starting with http:// or https:// are supported.To limit the crawl, expand “Advanced Parameters”: Crawl Limit and Crawl Depth both default to 1, are required, and cannot be less than 1; “Translate to Chinese?” defaults to No; Keywords is optional and is used as the search keyword. When you are done, click “Submit generation task”.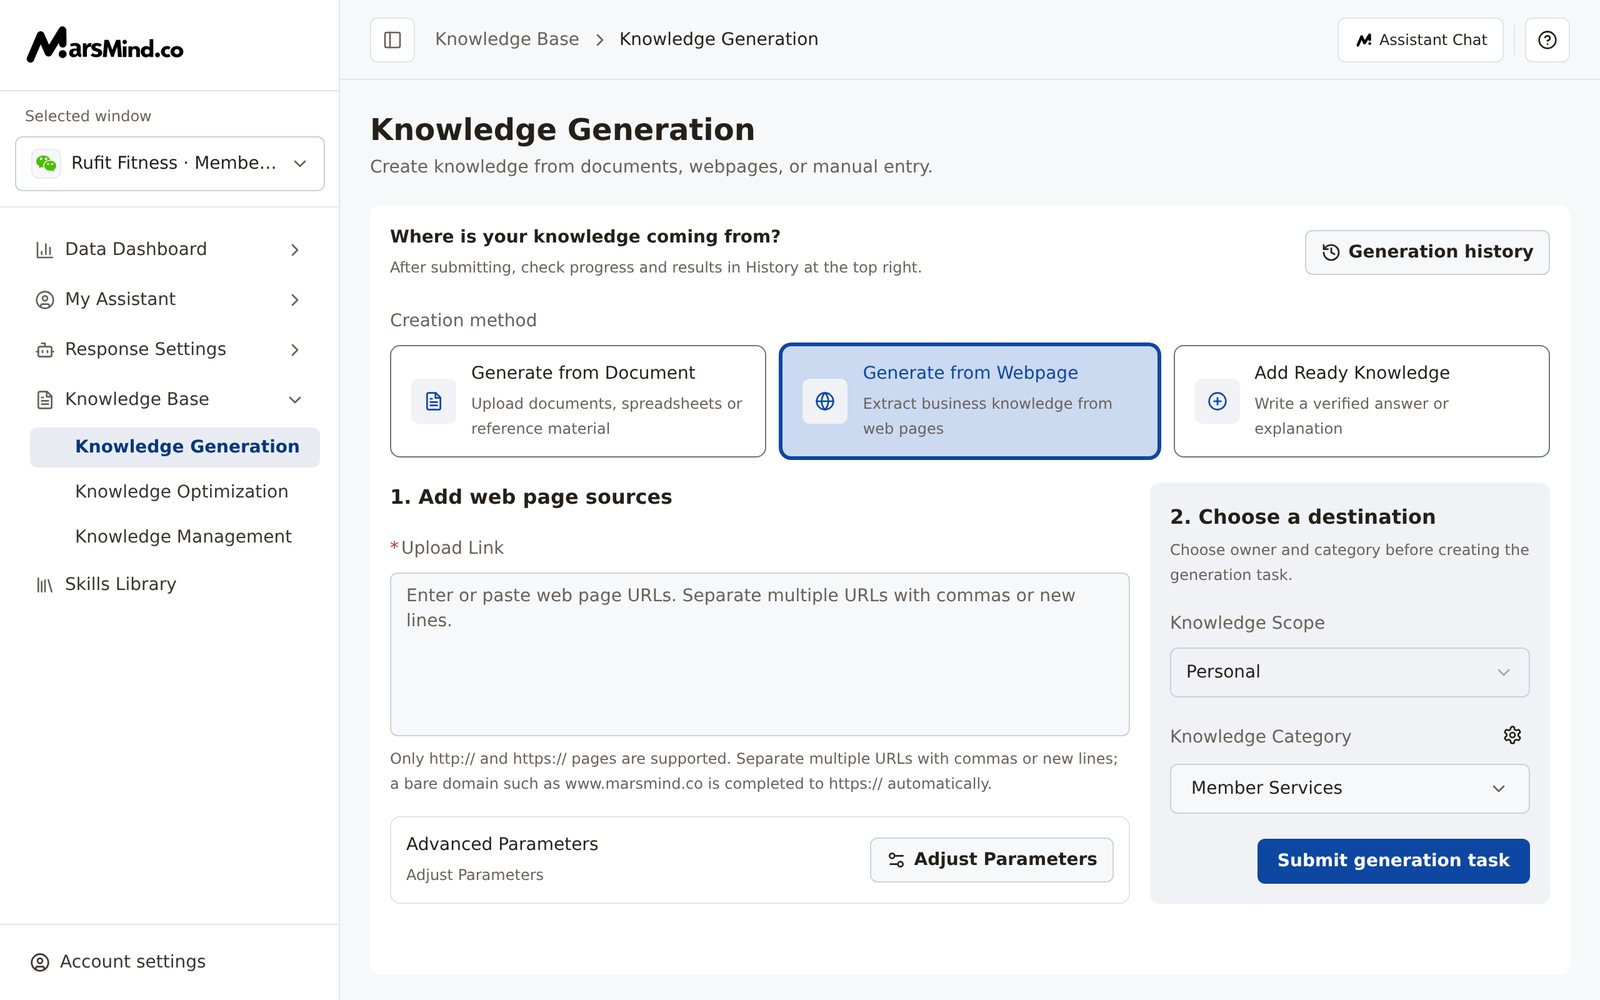
5
Add Ready Knowledge: Q&A, paragraph, or batch
In “1. Write your knowledge”, choose an Entry Type: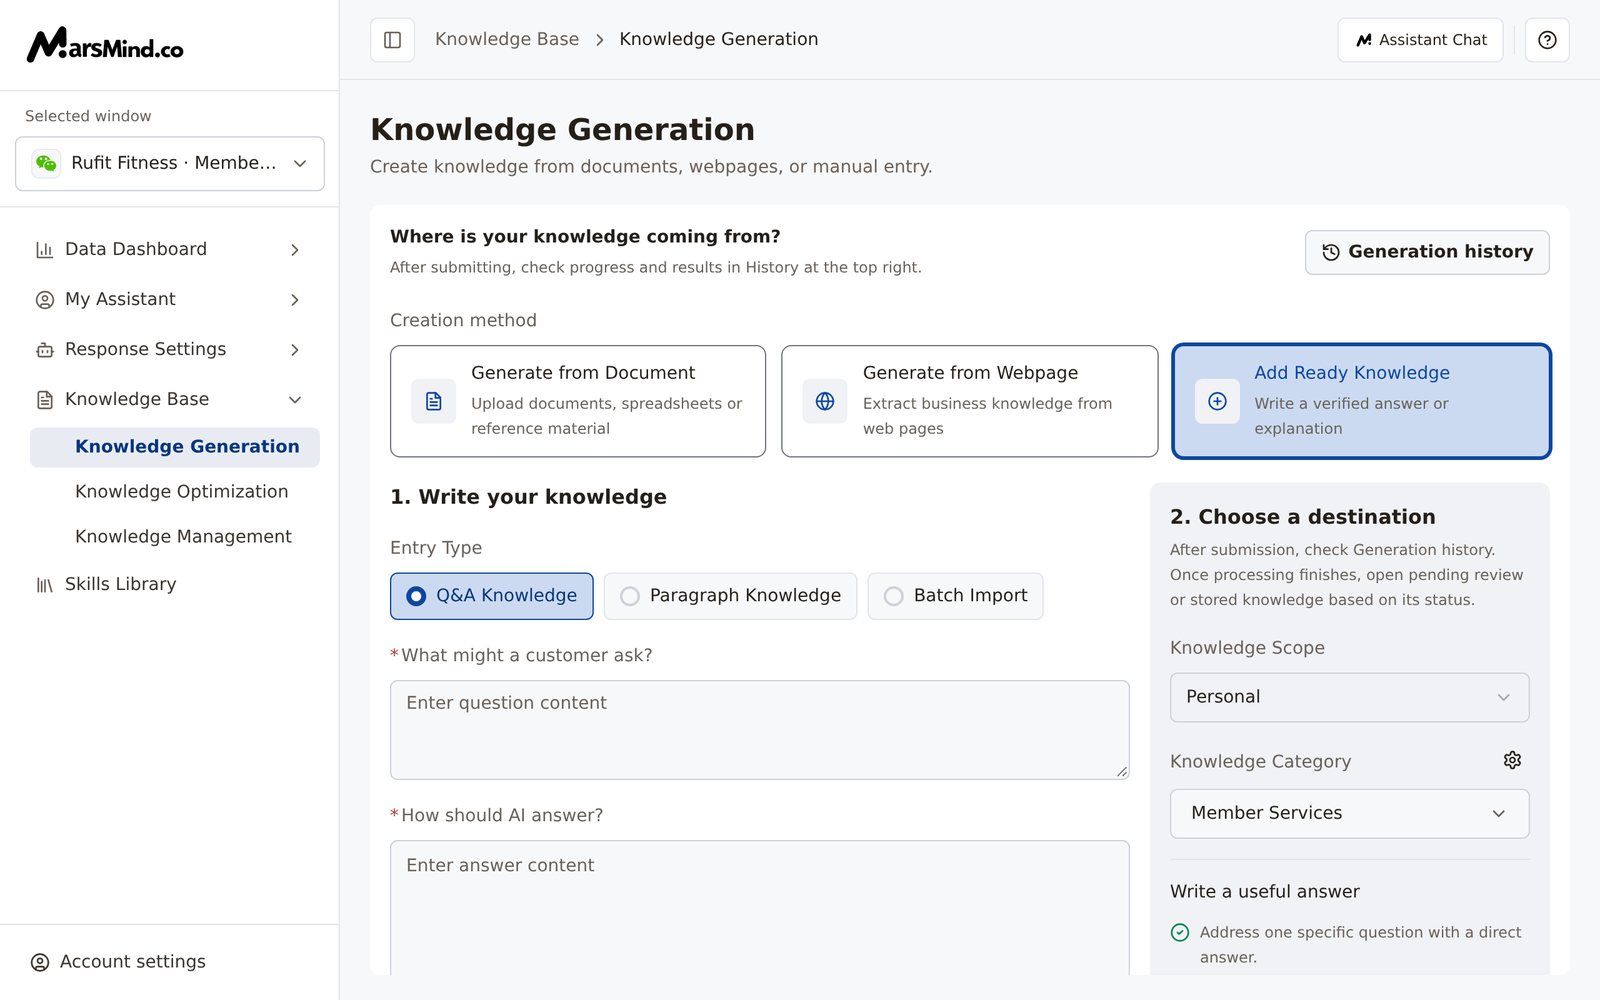
- Q&A Knowledge: fill in “What might a customer ask?” and “How should AI answer?”. The answer is rich text, and you can click “Insert File”; the right side lists the three requirements under “Write a useful answer” for you to check against before submitting.
- Paragraph Knowledge: fill in “Text Description” only.
- Batch Import: only template .xlsx files are accepted. Click “Download Template” and choose “Download QA format knowledge import template” or “Download paragraph format knowledge import template”; fill in the template columns, then upload. The upload area warns: “Do not upload a regular Excel or document file directly, or parsing may fail.”
6
Track progress and results in Generation history
The page switches here automatically after you submit, and you can also open it at any time from “Generation history” at the top right of the page. The list mixes tasks from all three methods and shows Method, Name, Status, Knowledge Scope, Category, and Task Time; the statuses are Processing, Processing complete, Processing failed, and Stopped. Tasks that are processing refresh automatically and show the “Submitted → Processing” task progress.For a task that is processing, click the stop icon in the row (the status becomes “Stopped”, and you can click the retry icon to restart it); failed tasks also have a retry icon. Once a task is complete, click “View result” in the Name column: the system first checks whether anything is still awaiting review, then opens Knowledge Optimization → Pending review or the stored knowledge view of Knowledge Management; while it checks, the button shows “Checking…”.Selecting task rows brings up the “N selected” action bar, where you can use “Batch Delete”.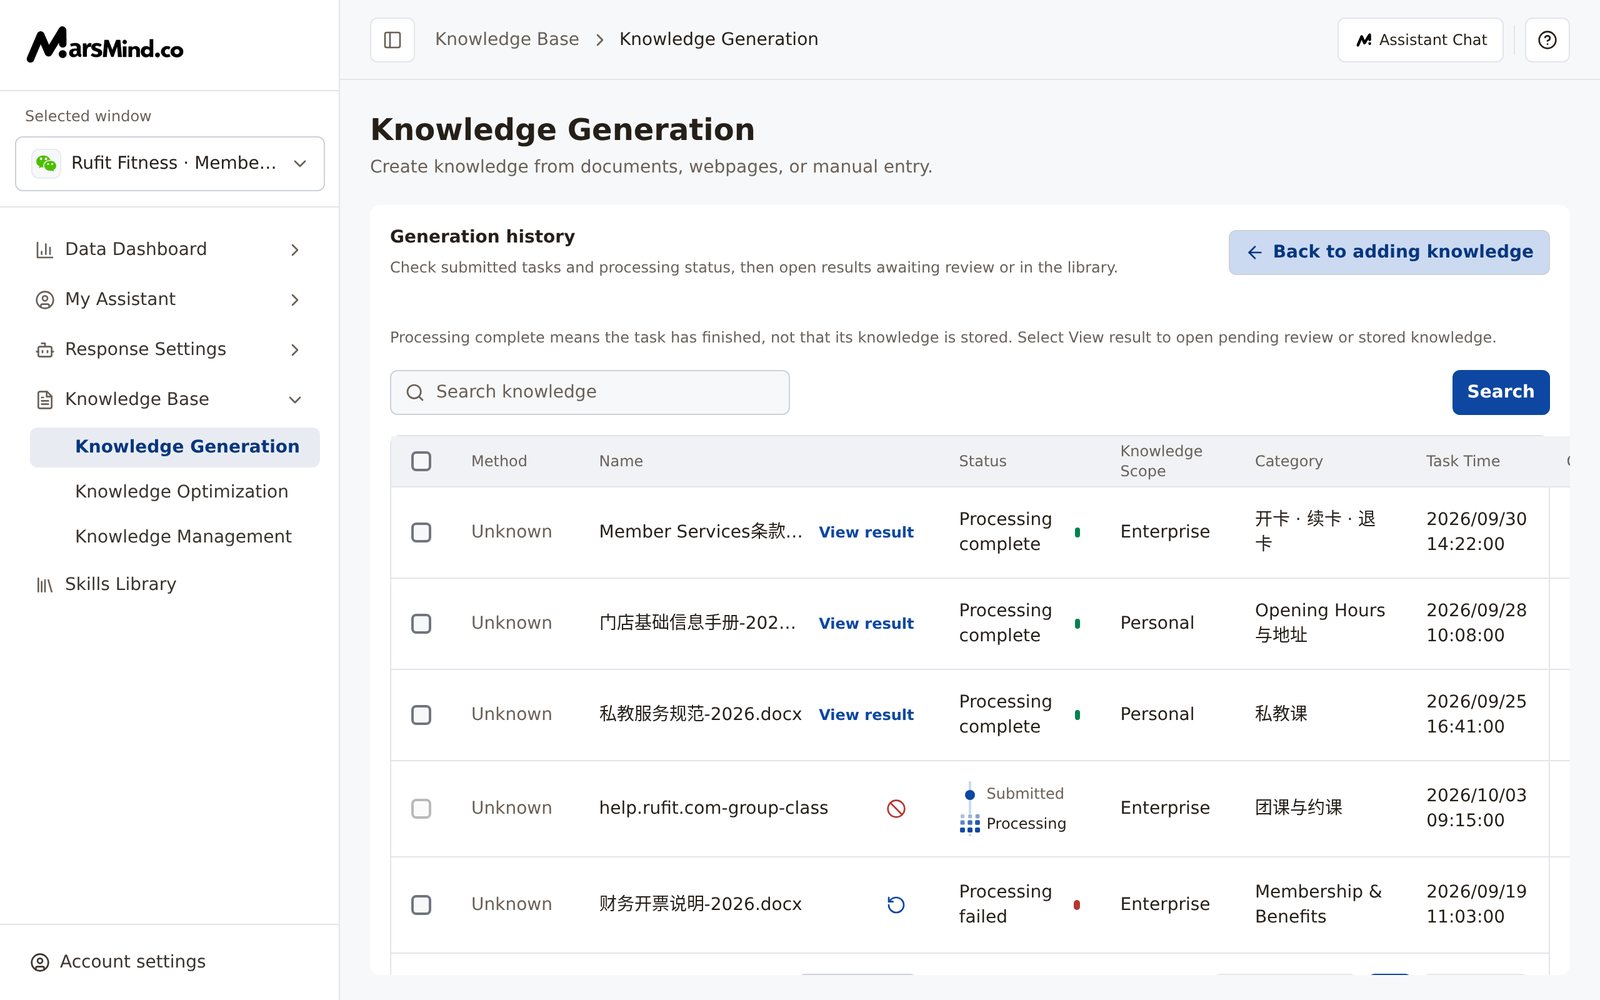
Checkpoints
- After submitting, the page switches to Generation history and shows “Task submitted. View its result in Generation history.”
- The task you just submitted shows the same Method, Name, Knowledge Scope, and Category as at submission.
- For the document method, every file shows a green check before you submit, with no failed files.
- A task with “Processing complete” has a “View result” link that opens pending-review or stored content.
Important notes
“Processing complete” only means the task has ended, not that the knowledge is stored (the page copy reads: “Processing complete means the task has finished, not that its knowledge is stored. Select View result to open pending review or stored knowledge.”). To get knowledge to the AI sooner, work through items in Knowledge Optimization → Pending review one by one; except for Auto Learning, which always needs manual review, other knowledge is accepted automatically if it is not processed within 24 hours.
Only the document method shows “Confirm Credits Consumption” (100 credits per document, counted by the number of documents); webpage generation and Add Ready Knowledge do not have this dialog.