> ## Documentation Index
> Fetch the complete documentation index at: https://docs.marsmind.co/llms.txt
> Use this file to discover all available pages before exploring further.
# New Contact Setup
> Configure new contact handling for the Selected window: auto-accept friend requests, send welcome messages in order, and collect customer information in the first conversation.
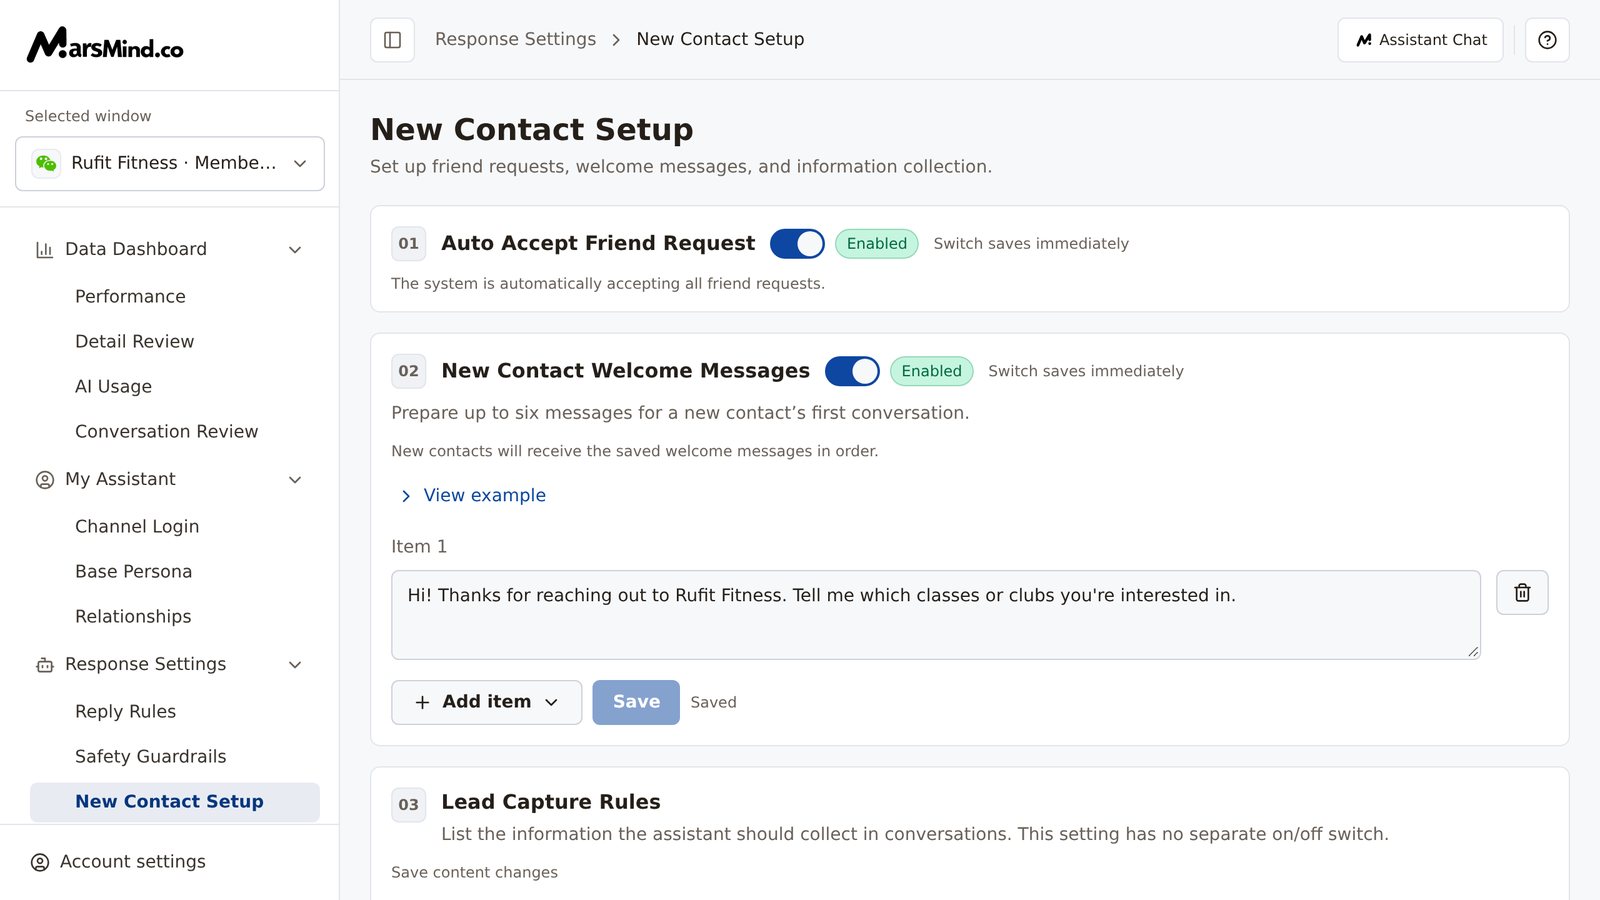
New Contact Setup handles the first conversations after a new contact comes in: it auto-accepts friend requests, sends the welcome messages you wrote in order, and collects the customer information you care about during the first conversation. The page is organized into three cards — 01 Auto Accept Friend Request, 02 New Contact Welcome Messages, and 03 Lead Capture Rules — and the configuration applies only to the window you select in Selected window on the left.
## When you'll need this
* You receive many friend requests and do not want to accept them one by one.
* You want the first conversation after a new contact is added to introduce the assistant, explain what it can help with, and how to reach a human.
* You want the assistant to also collect details such as budget and needs during the chat, so follow-up is easier.
* A friend request was not auto-accepted, or a new contact did not receive the welcome message, and you are here to check the switch and the content.
## How to get there
Left menu → Response Settings → New Contact Setup.
When the page opens, check Selected window at the top left first: all three cards are saved per window, so after switching windows you see a different set of settings. When no window is available, the page shows "No communication window is available", "Log in and bring a non-admin communication window online before continuing.", and a "Go to channel login" button — connect a window through [Channel Login](/en/guide/assistant/login-online) first.
 ## Steps
First confirm that Selected window at the top left is the window you want to configure, then continue.
How to tell it worked: the window name matches the assistant window you want to configure.
In card 01, flip the switch on. It saves immediately — there is no button to click; the badge changes from "Disabled" to "Enabled" and an "Auto accept friend request enabled" notification appears. If you do not want auto-accept, leave it off and go straight to the next step.
How to tell it worked: the badge shows "Enabled".
Note: once on, the system automatically accepts every friend request for this window, including ads or people you would rather not add; make sure this window can handle that before turning it on.
In card 02, "New Contact Welcome Messages", click "Add item" and choose a content type from the dropdown:
* Text: enter your wording; line breaks are supported;
* Image / File: choose a local file and it uploads automatically; once uploaded, the file name appears. A single image or file cannot exceed 100MB.
You can add up to 6 items, and each one can be deleted individually; they are sent in list order. If you are not sure what to write, click "View example" for sample wording. When the content is ready, click "Save".
## Steps
First confirm that Selected window at the top left is the window you want to configure, then continue.
How to tell it worked: the window name matches the assistant window you want to configure.
In card 01, flip the switch on. It saves immediately — there is no button to click; the badge changes from "Disabled" to "Enabled" and an "Auto accept friend request enabled" notification appears. If you do not want auto-accept, leave it off and go straight to the next step.
How to tell it worked: the badge shows "Enabled".
Note: once on, the system automatically accepts every friend request for this window, including ads or people you would rather not add; make sure this window can handle that before turning it on.
In card 02, "New Contact Welcome Messages", click "Add item" and choose a content type from the dropdown:
* Text: enter your wording; line breaks are supported;
* Image / File: choose a local file and it uploads automatically; once uploaded, the file name appears. A single image or file cannot exceed 100MB.
You can add up to 6 items, and each one can be deleted individually; they are sent in list order. If you are not sure what to write, click "View example" for sample wording. When the content is ready, click "Save".
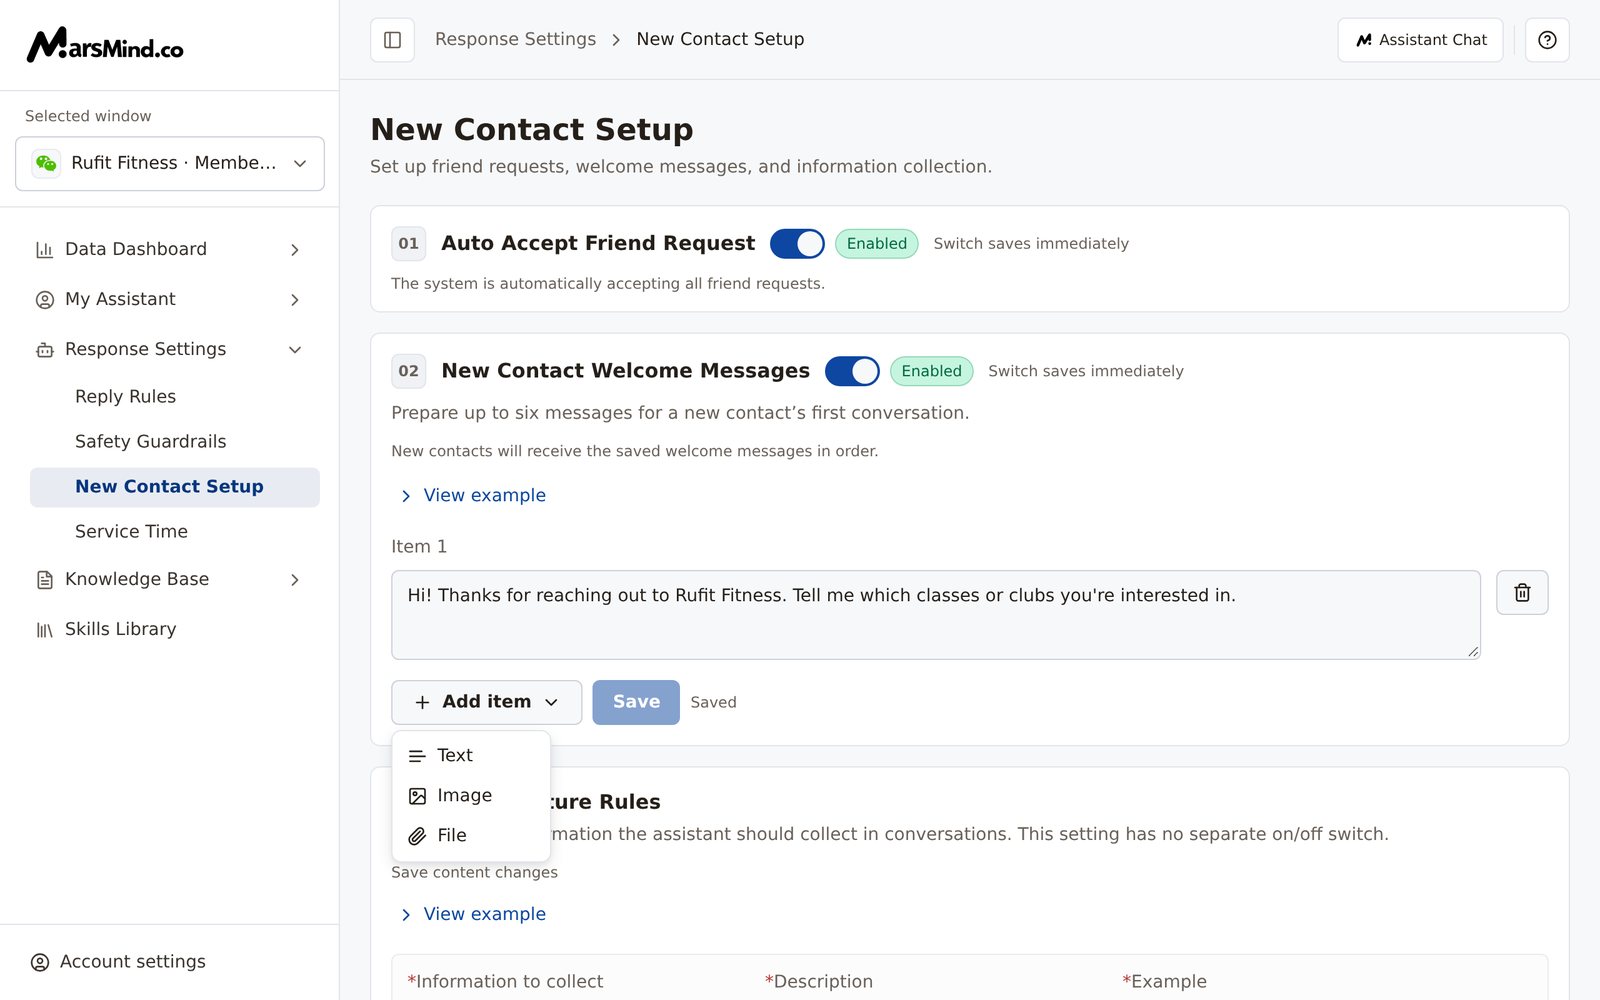 How to tell it worked: the status changes from "Unsaved" to "Saved", and a "Welcome message saved successfully" notification appears; if content has never been saved, it shows "No saved content yet".
Note: a finished upload is not the same as saved — images and files are submitted only after you click "Save". Welcome messages are sent only in the first conversation with a newly added contact; existing contacts already in your friend list will not receive them.
Once the content is saved, flip the switch in card 02 on; a "New contact welcome messages enabled" notification appears.
How to tell it worked: the card summary changes to "New contacts will receive the saved welcome messages in order." If it instead reads "Welcome messages are enabled, but no content has been saved. Add content and save it.", the content has not been saved — go back to the previous step and click "Save".
Note: you can turn the switch on first and add content later, but no welcome message is sent until the content is saved.
In card 03, click "Add item" to add a row with three inputs: Information to collect, Description, and Example. All three are marked with `*` and are required, for example "Budget / The customer's purchase budget or price range / under CNY 30,000"; click "View example" for a sample.
You can add up to 6 items, and each one can be deleted individually. When you are done, click "Save" at the bottom.
How to tell it worked: Current state at the bottom changes from "Unsaved" to "Saved · Runtime unconfirmed", and a "Lead capture rules saved." notification appears. If you made a mistake, click "Discard changes" to restore the last saved content.
Note: this card has no separate on/off switch — after saving, the assistant starts collecting information in conversations using the saved rules; if you do not want collection, delete all items and click "Save" — the status becomes "No custom content".
## Checkpoints
* Selected window on the left is the target window.
* The badge in card 01 shows "Enabled" (if you need friend requests auto-accepted).
* The switch in card 02 is on, the summary is "New contacts will receive the saved welcome messages in order.", and the content status is "Saved".
* Current state in card 03 is "Saved · Runtime unconfirmed", all three fields are filled in, and nothing is left "Unsaved".
* Use a test account to add the window as a friend: the friend request is accepted automatically and the welcome messages are sent in order. Only a real conversation can confirm that the runtime side has applied a "Saved · Runtime unconfirmed" configuration.
## Important notes
After you turn on "Auto Accept Friend Request", the system automatically accepts every friend request for this window, including ads or people you do not want to add. If you are not sure, keep it "Disabled" and handle requests manually first.
When you have unsaved content, switching menus or windows is blocked by a dialog titled "Discard unsaved changes?" that says "This page has unsaved changes. Leaving will discard them."; choose "Discard changes" to drop your input, or "Keep editing" to go back. If you refresh or close the tab directly, the browser shows its own leave confirmation. You cannot leave while a save or upload is in progress — the page shows "Wait for the current save or upload to finish before leaving."
The three cards save differently: the switches in 01 and 02 save instantly, while welcome content and capture rules are written only when you click "Save". Switches and content are submitted separately, so you do not need to save content before changing a switch.
After you save capture rules, the status shows "Saved · Runtime unconfirmed", which means the configuration is written to the backend but there is no confirmation yet that the runtime has applied it; use a real conversation with a new contact to verify.
Do not fill all 6 capture items at once: the more items you add, the more it feels like a survey, which hurts reply rates — start with the 1–3 most important ones. If you are stuck on wording, click "View example" and adapt it.
## Frequently asked questions
### The switch is on, but a new contact did not receive the welcome message. Why?
Check in order: does the summary in card 02 read "Welcome messages are enabled, but no content has been saved. Add content and save it."? The switch only controls whether messages are sent — content counts as saved only after you click "Save". Check whether the content is complete (if a text item is empty or an image or file did not upload successfully, saving shows "Please complete all welcome message content"). Check whether Selected window on the left is the window the customer is in — settings are saved per window. Also, welcome messages are only for the first conversation with a newly added contact; existing contacts in your friend list will not receive them.
### I uploaded an image or file, so why does saving still say the content is incomplete?
When you click "Save", the whole list is checked item by item. The most common cause is a text item with no content (text items cannot be empty); an image or file counts as valid content only after you choose the file, the upload finishes, and the file name appears. The page is not editable while an upload is in progress, so items with unfinished uploads never reach the save check; go through the list item by item, complete everything, and click "Save" again. A single image or file cannot exceed 100MB; over the limit, the page shows "Image size cannot exceed 100MB" or "File size cannot exceed 100MB".
### Can lead capture rules be turned off?
There is no separate switch. After saving, the assistant collects information in conversations using the saved rules; if you do not want collection, delete all items and click "Save" — the card status becomes "No custom content". Changing rules also requires clicking "Save" again to take effect; click "Discard changes" to drop the current edits.
### Why is the "Save" button grayed out and unclickable?
The button is disabled when there are no changes. Edit an input first (the status becomes "Unsaved") or add an item with "Add item", then save. The whole page is also temporarily not editable while the window configuration is still loading, an image or file is uploading, or a save is in progress.
### The page says "Could not load settings for this window. Retry before editing or saving." What should I do?
Click "Retry" next to the message to reload; until loading succeeds you cannot edit or save, which prevents overwriting existing settings. If it keeps failing, check your network first, or ask an admin to verify the saved settings for this window.
This documentation is built and hosted on [Mintlify](https://mintlify.com), a developer documentation platform.
How to tell it worked: the status changes from "Unsaved" to "Saved", and a "Welcome message saved successfully" notification appears; if content has never been saved, it shows "No saved content yet".
Note: a finished upload is not the same as saved — images and files are submitted only after you click "Save". Welcome messages are sent only in the first conversation with a newly added contact; existing contacts already in your friend list will not receive them.
Once the content is saved, flip the switch in card 02 on; a "New contact welcome messages enabled" notification appears.
How to tell it worked: the card summary changes to "New contacts will receive the saved welcome messages in order." If it instead reads "Welcome messages are enabled, but no content has been saved. Add content and save it.", the content has not been saved — go back to the previous step and click "Save".
Note: you can turn the switch on first and add content later, but no welcome message is sent until the content is saved.
In card 03, click "Add item" to add a row with three inputs: Information to collect, Description, and Example. All three are marked with `*` and are required, for example "Budget / The customer's purchase budget or price range / under CNY 30,000"; click "View example" for a sample.
You can add up to 6 items, and each one can be deleted individually. When you are done, click "Save" at the bottom.
How to tell it worked: Current state at the bottom changes from "Unsaved" to "Saved · Runtime unconfirmed", and a "Lead capture rules saved." notification appears. If you made a mistake, click "Discard changes" to restore the last saved content.
Note: this card has no separate on/off switch — after saving, the assistant starts collecting information in conversations using the saved rules; if you do not want collection, delete all items and click "Save" — the status becomes "No custom content".
## Checkpoints
* Selected window on the left is the target window.
* The badge in card 01 shows "Enabled" (if you need friend requests auto-accepted).
* The switch in card 02 is on, the summary is "New contacts will receive the saved welcome messages in order.", and the content status is "Saved".
* Current state in card 03 is "Saved · Runtime unconfirmed", all three fields are filled in, and nothing is left "Unsaved".
* Use a test account to add the window as a friend: the friend request is accepted automatically and the welcome messages are sent in order. Only a real conversation can confirm that the runtime side has applied a "Saved · Runtime unconfirmed" configuration.
## Important notes
After you turn on "Auto Accept Friend Request", the system automatically accepts every friend request for this window, including ads or people you do not want to add. If you are not sure, keep it "Disabled" and handle requests manually first.
When you have unsaved content, switching menus or windows is blocked by a dialog titled "Discard unsaved changes?" that says "This page has unsaved changes. Leaving will discard them."; choose "Discard changes" to drop your input, or "Keep editing" to go back. If you refresh or close the tab directly, the browser shows its own leave confirmation. You cannot leave while a save or upload is in progress — the page shows "Wait for the current save or upload to finish before leaving."
The three cards save differently: the switches in 01 and 02 save instantly, while welcome content and capture rules are written only when you click "Save". Switches and content are submitted separately, so you do not need to save content before changing a switch.
After you save capture rules, the status shows "Saved · Runtime unconfirmed", which means the configuration is written to the backend but there is no confirmation yet that the runtime has applied it; use a real conversation with a new contact to verify.
Do not fill all 6 capture items at once: the more items you add, the more it feels like a survey, which hurts reply rates — start with the 1–3 most important ones. If you are stuck on wording, click "View example" and adapt it.
## Frequently asked questions
### The switch is on, but a new contact did not receive the welcome message. Why?
Check in order: does the summary in card 02 read "Welcome messages are enabled, but no content has been saved. Add content and save it."? The switch only controls whether messages are sent — content counts as saved only after you click "Save". Check whether the content is complete (if a text item is empty or an image or file did not upload successfully, saving shows "Please complete all welcome message content"). Check whether Selected window on the left is the window the customer is in — settings are saved per window. Also, welcome messages are only for the first conversation with a newly added contact; existing contacts in your friend list will not receive them.
### I uploaded an image or file, so why does saving still say the content is incomplete?
When you click "Save", the whole list is checked item by item. The most common cause is a text item with no content (text items cannot be empty); an image or file counts as valid content only after you choose the file, the upload finishes, and the file name appears. The page is not editable while an upload is in progress, so items with unfinished uploads never reach the save check; go through the list item by item, complete everything, and click "Save" again. A single image or file cannot exceed 100MB; over the limit, the page shows "Image size cannot exceed 100MB" or "File size cannot exceed 100MB".
### Can lead capture rules be turned off?
There is no separate switch. After saving, the assistant collects information in conversations using the saved rules; if you do not want collection, delete all items and click "Save" — the card status becomes "No custom content". Changing rules also requires clicking "Save" again to take effect; click "Discard changes" to drop the current edits.
### Why is the "Save" button grayed out and unclickable?
The button is disabled when there are no changes. Edit an input first (the status becomes "Unsaved") or add an item with "Add item", then save. The whole page is also temporarily not editable while the window configuration is still loading, an image or file is uploading, or a save is in progress.
### The page says "Could not load settings for this window. Retry before editing or saving." What should I do?
Click "Retry" next to the message to reload; until loading succeeds you cannot edit or save, which prevents overwriting existing settings. If it keeps failing, check your network first, or ask an admin to verify the saved settings for this window.
This documentation is built and hosted on [Mintlify](https://mintlify.com), a developer documentation platform.