> ## Documentation Index
> Fetch the complete documentation index at: https://docs.marsmind.co/llms.txt
> Use this file to discover all available pages before exploring further.
# Relationships
> Set Customer, Colleague, Muted, or Supervisor relationships for the contacts and groups in the current communication window, and decide how the AI treats each conversation.
Relationships tells the AI who is a customer, who is a colleague, who to stay silent with, and who receives reports. It applies to the "Selected window" you pick in the sidebar; the AI then handles communication according to these relationships.
## When you'll need this
* After connecting a new window, go through its contacts and groups first, so the AI does not mistake internal discussions for customer inquiries.
* A customer group or internal group should not be answered by the AI: set it to "Muted".
* Designate the people who receive proactive reports on key events by setting them as "Supervisor".
* A friend or group was added in the channel but does not show in the list: sync your contacts.
## How to get there
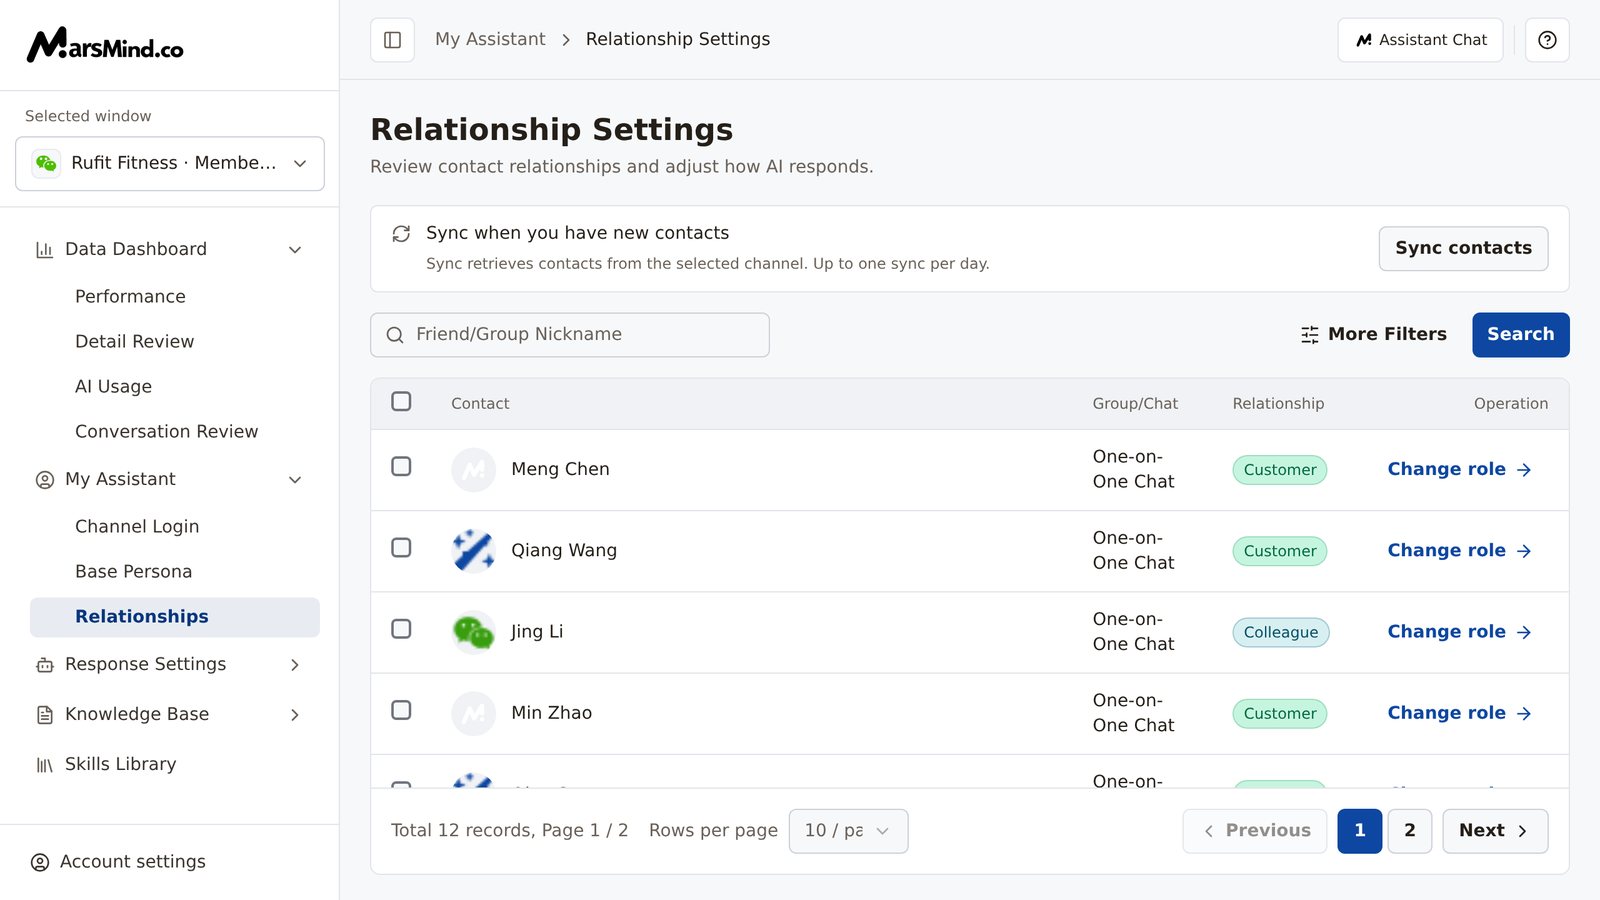
Left menu → My Assistant → Relationships. First select the window you want to configure under "Selected window" in the sidebar. From top to bottom, the page shows the "Sync when you have new contacts" card, the search and filter area, and the contact and group list.
 ## Steps
Relationship settings apply only to the "Selected window"; when you switch windows, the list and the roles you have set switch to that window's data as well.
* No window selected yet: the page shows "No communication window is available". Click "Go to channel login" to connect a channel first.
* Unsupported window selected: only logged-in WeChat and WeCom accounts support relationship settings. Website link, Mini Program, and Official Account windows show "This window has no connected WeChat or WeCom account for relationship settings. Connect one in Login & Channels first." Click "Connect a window" to resolve it.
How to tell it worked: the "Sync when you have new contacts" card and the list are visible, which means the current window is supported.
The list shows all contacts and groups under the current window account by default. Narrow it down with filters first:
* WeChat account: search by "Friend/Group Nickname"; "More Filters" includes "Label", "Relationship", and "Type" (One-on-One and Group Chats / One-on-One Chat / Group Chat).
* WeCom account: search by "Contact Nickname"; "More Filters" includes "Contact Mobile", "Relation Type" (Internal / External), "Relationship", and "Contact Type".
After you change the conditions, click "Search" to refresh the list (pressing Enter in the search box does the same). Conditions that are applied show under "Applied Filters"; click "Reset" to restore the defaults.
How to tell it worked: the table lists only the contacts or groups you want to handle, with the columns "Contact", "Group/Chat", and "Relationship", and a "Change role" action at the end of each row.
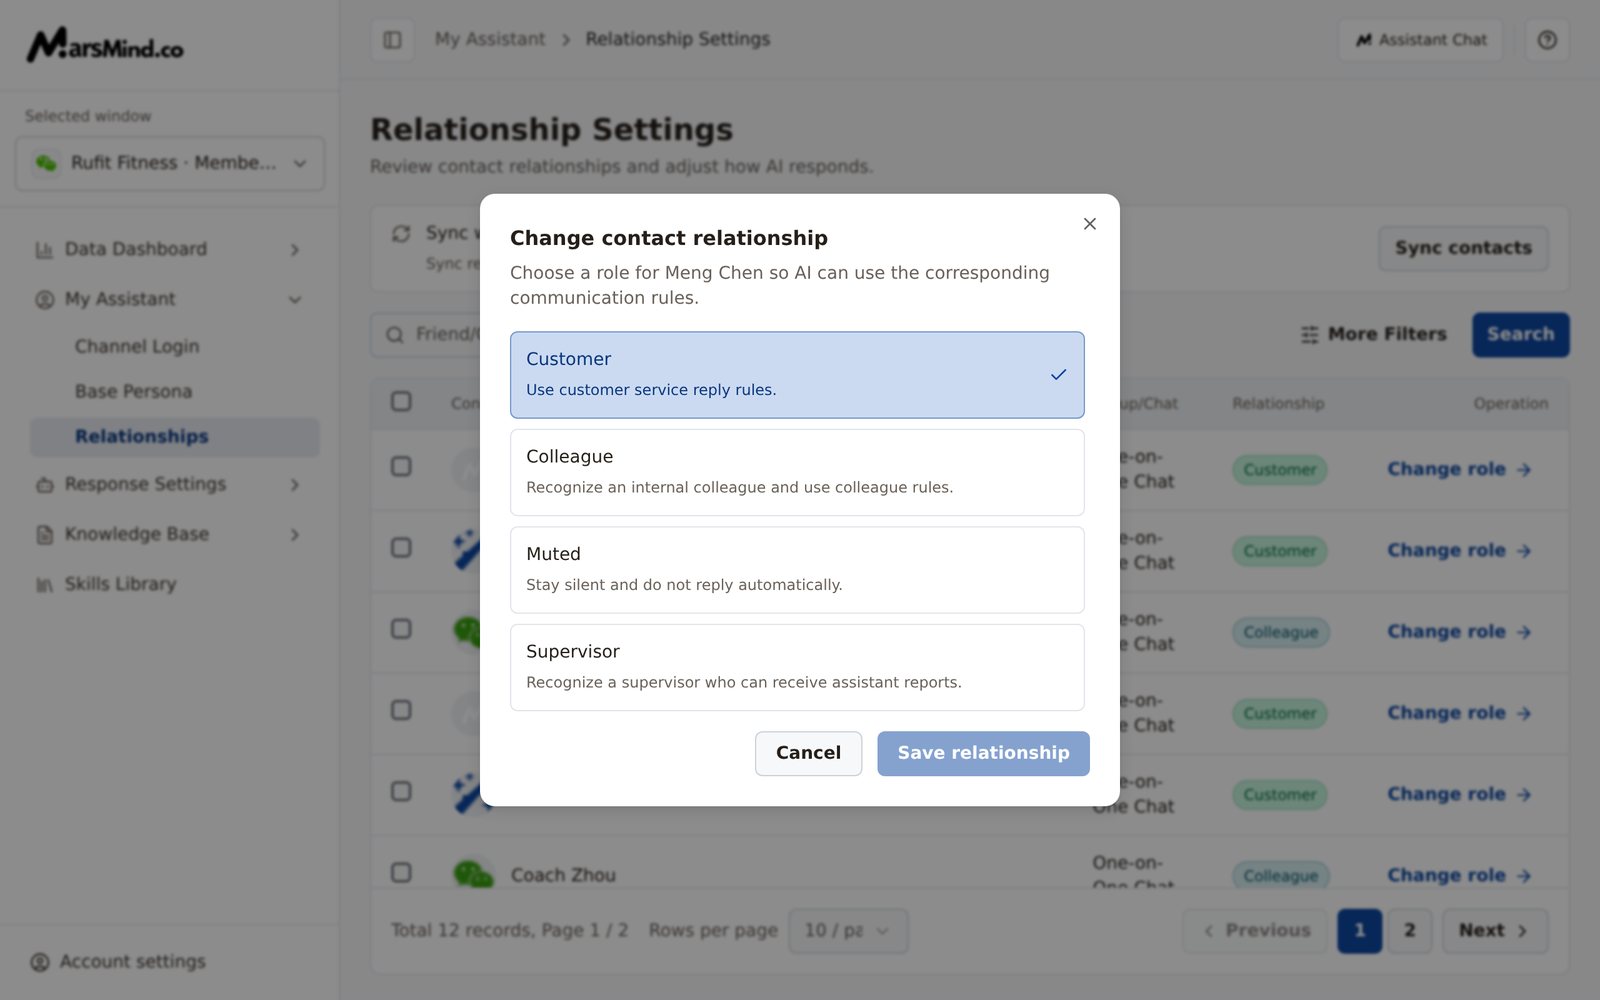
Click "Change role" at the end of a row to open the "Change contact relationship" dialog: choose one of four roles for the selected contact — "Customer", "Colleague", "Muted", or "Supervisor". Each role has a description below it:
* Customer: the contact is handled as a customer, with customer service reply rules.
* Colleague: recognized as an internal colleague, with colleague rules.
* Muted: kept silent — no automatic replies.
* Supervisor: recognized as a supervisor who can receive assistant reports.
Click "Save relationship" once selected; the button stays disabled as long as the role has not changed.
How to tell it worked: a "Set 1 contacts as …" message appears, and the relationship badge in that row updates at the same time.
## Steps
Relationship settings apply only to the "Selected window"; when you switch windows, the list and the roles you have set switch to that window's data as well.
* No window selected yet: the page shows "No communication window is available". Click "Go to channel login" to connect a channel first.
* Unsupported window selected: only logged-in WeChat and WeCom accounts support relationship settings. Website link, Mini Program, and Official Account windows show "This window has no connected WeChat or WeCom account for relationship settings. Connect one in Login & Channels first." Click "Connect a window" to resolve it.
How to tell it worked: the "Sync when you have new contacts" card and the list are visible, which means the current window is supported.
The list shows all contacts and groups under the current window account by default. Narrow it down with filters first:
* WeChat account: search by "Friend/Group Nickname"; "More Filters" includes "Label", "Relationship", and "Type" (One-on-One and Group Chats / One-on-One Chat / Group Chat).
* WeCom account: search by "Contact Nickname"; "More Filters" includes "Contact Mobile", "Relation Type" (Internal / External), "Relationship", and "Contact Type".
After you change the conditions, click "Search" to refresh the list (pressing Enter in the search box does the same). Conditions that are applied show under "Applied Filters"; click "Reset" to restore the defaults.
How to tell it worked: the table lists only the contacts or groups you want to handle, with the columns "Contact", "Group/Chat", and "Relationship", and a "Change role" action at the end of each row.
Click "Change role" at the end of a row to open the "Change contact relationship" dialog: choose one of four roles for the selected contact — "Customer", "Colleague", "Muted", or "Supervisor". Each role has a description below it:
* Customer: the contact is handled as a customer, with customer service reply rules.
* Colleague: recognized as an internal colleague, with colleague rules.
* Muted: kept silent — no automatic replies.
* Supervisor: recognized as a supervisor who can receive assistant reports.
Click "Save relationship" once selected; the button stays disabled as long as the role has not changed.
How to tell it worked: a "Set 1 contacts as …" message appears, and the relationship badge in that row updates at the same time.
 Select the checkboxes on the left of multiple rows. The header checkbox is "Select all contacts on this page" and selects only the current page. Once anything is selected, a "N selected" action bar appears; click "Set as Customer", "Set as Colleague", "Mute", or "Set as Supervisor" to submit.
How to tell it worked: a "Set N contacts as …" message appears, the list refreshes automatically, and the selection is cleared. To drop the selection, click "Clear Selection" on the right of the action bar.
Note: batch actions take effect immediately with no confirmation step, and changing pages clears the selected contacts.
The list is based on the contacts last synced from the channel. When a newly added friend or group cannot be found in the list, click "Sync contacts" on the card at the top; the system fetches contacts from the current channel again. The card notes "Up to one sync per day." — once you use it that day, the button is greyed out and becomes available again after 0:00 the next day.
How to tell it worked: a "Refresh successful" message appears, the list reloads, and the new contact shows in the list.
## Checkpoints
* The target contact or group shows the role you set in the "Relationship" column of the list.
* Every change shows a "Set N contacts as …" message and the list updates automatically; no manual page refresh is needed.
* Once roles are set, the AI treats customers, colleagues, and muted contacts exactly as the four role descriptions above say.
Batch actions have no confirmation step: clicking "Set as …" takes effect immediately and refreshes the list, so a wrong click can only be corrected by setting the role again. Changing pages clears the selection, and batch actions apply only to the contacts selected on the current page.
"Sync contacts" can be used only once per calendar day (00:00–24:00); after one use, the button is greyed out. If you need to set relationships for new contacts right away, plan the sync before you do that.
The four roles match the descriptions in the dialog: Customer — handled as a customer, with customer service reply rules; Colleague — recognized as an internal colleague, with colleague rules; Muted — kept silent, with no automatic replies; Supervisor — recognized as a supervisor who can receive assistant reports.
The "Supervisor" role is the delivery prerequisite for Key Event Active Reporting: only contacts set as "Supervisor" receive the content that "Key Event Active Reporting" in [Reply Rules](/en/guide/response/reply-rules) sends out.
Group chats are in this same list. Filter by "Type" or "Contact Type" to find group chats, and set internal groups to "Muted" to keep the AI from posting in groups where it should not speak.
Two problems are common when roles are set wrong: internal discussions get answered as customer inquiries, or the AI speaks in groups where it should stay quiet. Going through the "Relationship" column regularly reduces both.
## Frequently asked questions
### The page says "This window has no connected WeChat or WeCom account for relationship settings" — what should I do?
Relationship settings support only logged-in WeChat and WeCom accounts. The message appears when the current window is a Website link, Mini Program, or Official Account, or when the account was not matched. Click "Connect a window" in the notice, complete the login or binding for that channel in [Channel Login](/en/guide/assistant/login-online), then come back to configure.
### Why can't I click "Sync contacts"?
You can sync at most once per calendar day (00:00–24:00); the card says "Up to one sync per day." If you already used it that day, the button is greyed out and becomes available again after 0:00 the next day.
### A newly added friend or group is missing from the list?
The list data comes from the last synced contacts. Click "Sync contacts" at the top first; once "Refresh successful" appears, search or filter again.
### I made a batch change by mistake. Can I undo it?
No. Batch buttons take effect immediately and have no confirmation step. Select those contacts again and use another "Set as …" button to change them back.
### I set someone as "Supervisor", but no reports arrive. Why?
"Supervisor" is only the delivery prerequisite for reports; when and in what format reports are sent is configured under "Key Event Active Reporting" in [Reply Rules](/en/guide/response/reply-rules). Only after both are set up do contacts marked "Supervisor" receive reports.
This documentation is built and hosted on [Mintlify](https://mintlify.com), a developer documentation platform.
Select the checkboxes on the left of multiple rows. The header checkbox is "Select all contacts on this page" and selects only the current page. Once anything is selected, a "N selected" action bar appears; click "Set as Customer", "Set as Colleague", "Mute", or "Set as Supervisor" to submit.
How to tell it worked: a "Set N contacts as …" message appears, the list refreshes automatically, and the selection is cleared. To drop the selection, click "Clear Selection" on the right of the action bar.
Note: batch actions take effect immediately with no confirmation step, and changing pages clears the selected contacts.
The list is based on the contacts last synced from the channel. When a newly added friend or group cannot be found in the list, click "Sync contacts" on the card at the top; the system fetches contacts from the current channel again. The card notes "Up to one sync per day." — once you use it that day, the button is greyed out and becomes available again after 0:00 the next day.
How to tell it worked: a "Refresh successful" message appears, the list reloads, and the new contact shows in the list.
## Checkpoints
* The target contact or group shows the role you set in the "Relationship" column of the list.
* Every change shows a "Set N contacts as …" message and the list updates automatically; no manual page refresh is needed.
* Once roles are set, the AI treats customers, colleagues, and muted contacts exactly as the four role descriptions above say.
Batch actions have no confirmation step: clicking "Set as …" takes effect immediately and refreshes the list, so a wrong click can only be corrected by setting the role again. Changing pages clears the selection, and batch actions apply only to the contacts selected on the current page.
"Sync contacts" can be used only once per calendar day (00:00–24:00); after one use, the button is greyed out. If you need to set relationships for new contacts right away, plan the sync before you do that.
The four roles match the descriptions in the dialog: Customer — handled as a customer, with customer service reply rules; Colleague — recognized as an internal colleague, with colleague rules; Muted — kept silent, with no automatic replies; Supervisor — recognized as a supervisor who can receive assistant reports.
The "Supervisor" role is the delivery prerequisite for Key Event Active Reporting: only contacts set as "Supervisor" receive the content that "Key Event Active Reporting" in [Reply Rules](/en/guide/response/reply-rules) sends out.
Group chats are in this same list. Filter by "Type" or "Contact Type" to find group chats, and set internal groups to "Muted" to keep the AI from posting in groups where it should not speak.
Two problems are common when roles are set wrong: internal discussions get answered as customer inquiries, or the AI speaks in groups where it should stay quiet. Going through the "Relationship" column regularly reduces both.
## Frequently asked questions
### The page says "This window has no connected WeChat or WeCom account for relationship settings" — what should I do?
Relationship settings support only logged-in WeChat and WeCom accounts. The message appears when the current window is a Website link, Mini Program, or Official Account, or when the account was not matched. Click "Connect a window" in the notice, complete the login or binding for that channel in [Channel Login](/en/guide/assistant/login-online), then come back to configure.
### Why can't I click "Sync contacts"?
You can sync at most once per calendar day (00:00–24:00); the card says "Up to one sync per day." If you already used it that day, the button is greyed out and becomes available again after 0:00 the next day.
### A newly added friend or group is missing from the list?
The list data comes from the last synced contacts. Click "Sync contacts" at the top first; once "Refresh successful" appears, search or filter again.
### I made a batch change by mistake. Can I undo it?
No. Batch buttons take effect immediately and have no confirmation step. Select those contacts again and use another "Set as …" button to change them back.
### I set someone as "Supervisor", but no reports arrive. Why?
"Supervisor" is only the delivery prerequisite for reports; when and in what format reports are sent is configured under "Key Event Active Reporting" in [Reply Rules](/en/guide/response/reply-rules). Only after both are set up do contacts marked "Supervisor" receive reports.
This documentation is built and hosted on [Mintlify](https://mintlify.com), a developer documentation platform.